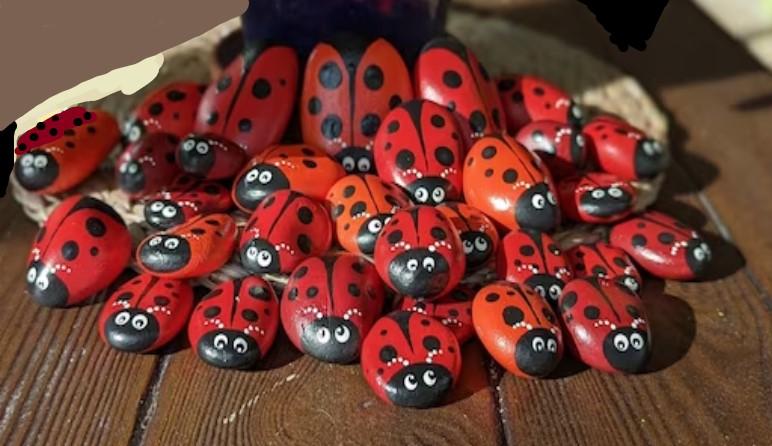
Ladybug painted rocks have become a popular and charming addition to gardens, home décor, and craft projects. These delightful, tiny creatures are not only a symbol of good luck but also make for fun, unique, and eye-catching decorations. With endless creative possibilities, ladybug rock painting is a captivating activity for people of all ages, offering an opportunity to express personal artistic flair while leaving a touch of whimsy wherever they are placed.
To create your own ladybug painted rocks, you simply need a few supplies such as smooth, round or oval rocks, acrylic paint, a black Sharpie marker, and wiggle eyes. With these items in hand, your imagination is the only limit to the designs and patterns you can create. Painted ladybugs can be as simple or as intricate as you desire, and they seamlessly blend into various environments, bringing a vibrant and cheerful touch to their surroundings.
Not only do these painted rocks make for captivating decorations, but they also serve as engaging art projects for kids, providing an enjoyable and educational experience. Fast becoming a favorite among DIY enthusiasts and hobbyists, ladybug rock painting is an excellent way to connect with nature, add a personal touch to your space, and share your creativity with others.
Ladybug Painted Rocks: Materials
To create your own ladybug painted rocks, you’ll need a few essential materials. First and foremost, you’ll need rocks. Smooth rocks, like river rocks, are perfect for this project as they provide an ideal surface for painting. You can find these rocks in your backyard or purchase them from a local landscaping store.
Next, you’ll need acrylic paint in various colors, especially red or orange tones for the ladybug’s body and black paint for its spots and head. Acrylic paint is a great choice for this project because it adheres well to rocks and is relatively fast-drying.
A set of paintbrushes in different sizes is required for applying the paint to your rocks. A dotting tool or even the end of a paintbrush handle can be used to create the ladybug’s spots with precision.
To draw the ladybug’s facial details, a black Sharpie marker works well. This allows you to create sharp lines and ensures that the details will be permanent.
Tacky glue may be needed if you’d like to attach additional decorations to your rock, such as googly eyes or small embellishments. This type of glue is suitable for bonding a variety of materials and dries clear, making it practically invisible on your finished project.
Once you’ve completed your ladybug painted rocks, it’s important to seal them with a clear sealer to protect your design from the elements and ensure its longevity. You can find a variety of sealers in spray or brush-on form at your local craft store.
In summary, to create a ladybug painted rocks, you’ll need the following materials:
- Smooth rocks
- Acrylic paint in various colors (red, black, and additional colors if desired)
- Paintbrushes in different sizes
- Dotting tool or paintbrush handle for creating spots
- Black Sharpie marker for facial details
- Tacky glue (optional, for attaching embellishments)
- Clear sealer to protect your design
Creating Ladybug Painted Rocks
Preparing the Rocks
To start creating your ladybug painted rocks, you’ll first need to choose the right rocks. Look for flat, smooth surfaces that can easily accommodate the ladybug design. Once you have selected your rocks, thoroughly clean them to remove any dirt or debris. Allow the rocks to dry completely before moving on to the next step.
Painting the Base
After your rocks are clean and dry, it’s time to paint the base. Using acrylic craft paint, choose a bright red or orange color for the ladybug’s body. You can either use a paintbrush or a sponge to apply the paint. Ensure that the entire rock is covered and allow the paint to dry completely before proceeding.
Adding the Ladybug Details
Next, use a smaller brush to paint the (ladybug)’s head using black acrylic paint. For the ladybug’s wings, you can either paint a simple dividing line down the center of the rock or create a more detailed design by adding some curvature and contour. Once the wings are painted, add dots on the wings using a thin brush or a toothpick.
To give your ladybug some personality, you may choose to add googly eyes. These can be glued onto the rock using a strong adhesive, or alternatively, you can paint eyes directly onto the rock.
Sealing and Protecting
Once your painted ladybug rocks are complete and all the paint is dry, it is essential to seal and protect your artwork. Apply a coat of clear outdoor sealer or a layer of Mod Podge to ensure the paint is protected from the elements. Allow the sealer to dry completely before displaying your ladybug painted rocks in your garden or gifting them to friends and family.
Ladybug Painted Rocks Painting Ideas
Ladybug painted rocks can be a wonderful addition to your garden, home, or even as a fun activity for kids. Here are some creative ways to use them.
Garden Decor
Integrating ladybug painted rocks into your garden can add a whimsical touch and bring a bit of life to your outdoor space. Place them around flower beds, in plant pots, or even along garden paths to create a delightful visual effect. Not only do they bring color and charm to your garden, but they also serve as a form of garden art.
Tic Tac Toe Game
Transform your ladybug rocks into a fun outdoor game for the whole family. Paint half of your rocks with ladybug designs and the other half with a different design, such as bees or butterflies, to represent Xs and Os. Use a simple wooden board or painted grid on a patio for a unique tic tac toe game that adds a playful touch to your garden.
Fairy Garden
Create a magical fairy garden with ladybug painted rocks as unique decorations. These colorful and charming rocks can be used as pathways, stepping stones, or even as a decorative feature in a miniature landscape. Include small plants, pebbles, and other garden markers to enhance your fairy garden.
| Items | Description |
|---|---|
| Ladybug Rocks | Painted with vibrant colors |
| Small Plants | Miniature foliage |
| Pebbles | Different sizes and shapes |
Paper Weight
Utilize your ladybug painted rocks as adorable and functional paperweights in your home office or as a gift to someone who appreciates whimsical yet practical items. Place them on top of important documents, memos, or even on coloring pages to keep them in place while adding an artistic touch to your workspace.
Garden Markers
DIY ladybug rocks can also be used as garden markers to identify and differentiate various plants in your garden. Paint the name of the particular plant or its characteristic color on the back of the ladybug painted rock and place it near the base of the plant. This not only adds a touch of personality to your garden but also helps make plant identification easier.
Implementing ladybug painted rocks in these creative ways can bring personality and fun to various aspects of your home and garden, while also providing engaging activities for all ages to enjoy.
Selling Ladybug Painted Rocks
Setting up an Etsy Account
To start selling ladybug painted rocks, you can set up an Etsy account. Etsy is a popular platform for selling handmade and unique items, making it perfect for showcasing your colorful, hand-painted rocks. Creating an account is straightforward – simply provide your email address, create a password, and follow the step-by-step instructions to set up your shop.
Pricing and Shipping
When it comes to pricing your ladybug painted rocks, consider the time, materials, and effort that goes into each piece. To get an idea of the going rate, you can browse Etsy for similar items. In general, ladybug painted rocks sell for $5 to $30 each, depending on their size, detail, and quality.
Shipping is an important factor to consider when selling on Etsy. Offer both domestic and international shipping options to attract a wider range of customers. You can either include the shipping costs in the item’s price or charge it separately. To provide the best value for your customers:
- Use sturdy packaging to protect your painted rocks during transit.
- Whenever possible, use flat-rate shipping boxes to save on postage.
- Consider offering free shipping for orders over a certain amount to encourage customers to make larger purchases.
By creating an Etsy account, pricing your ladybug painted rocks appropriately, and providing reasonable shipping options, you can showcase your unique creations and attract customers searching for that perfect, one-of-a-kind gift.
Personalized Tips for Shopping and Crafting
Shopping for ladybug painted rocks can be a delightful experience, especially when you find unique pieces that match your style. Etsy offers a variety of ladybug painted rocks and rock ladybugs perfect for garden decor or as a Mother’s Day gift. To stay updated with new releases and seasonal promotions, consider signing up for newsletters from your favorite Etsy sellers.
Subscribing to a seller’s newsletter ensures you receive personalized tips, special offers, and the latest designs delivered directly to your inbox. This way, you don’t miss out on any new, elegantly hand-painted rock ladybugs. Additionally, subscribing to a rock painting blog can provide you with new ideas and inspire your creativity, like these 50+ easy-peasy ladybug rock painting ideas.
If you prefer crafting your own ladybug rocks, there are several techniques you can use to create beautiful designs. You’ll need suitable rock, acrylic paint, paintbrushes, and a good sealant to protect your art. To make your project even more personalized, you can embellish your ladybug rocks with plants, real or fake, to blend seamlessly into your garden or home decor.
Remember, practice makes perfect, so don’t be discouraged if your first few attempts don’t yield the desired results. Stay patient, and you’ll soon be creating beautiful ladybug painted rocks that make for delightful gifts and home accents.
In conclusion, whether you’re shopping for unique ladybug painted rocks or crafting your own, staying informed through newsletters and exploring personalized tips can make the entire experience enjoyable. Happy shopping and crafting!
Ladybug Painted Rocks FAQs
How do I paint a rock to look like a ladybug?
To paint a rock to look like a ladybug, first, clean and dry the rock thoroughly. Paint the entire rock with white acrylic paint and let it dry. Then, paint the top half of the rock with red or any desired color for the ladybug’s wings and let it dry. Now, paint the bottom half with black for the head, followed by adding black dots on the wings, and finally, draw a thin line with black paint between the wings to separate them1.
What materials do I need for ladybug rock painting?
For ladybug rock painting, you will need:
- Smooth rocks (preferably with a flat surface)
- Acrylic paints (white, red, black)
- Paintbrushes (various sizes)
- A container for water (to rinse brushes)
- Palette or paper plate (for mixing paint)
- Newspaper or a cloth (to protect the work surface)
What is the best paint for creating ladybug painted rocks?
Acrylic paint is the best choice for creating ladybug painted rocks due to its versatility, water resistance, and ability to adhere well to various surfaces, including rocks2. It also dries quickly and offers a wide range of colors.
What are some creative ideas for decorating ladybug rocks?
Some creative ideas for decorating ladybug rocks include:
- Painting ladybugs in different colors, patterns, and sizes3
- Adding names, initials, or dates to personalize them
- Creating a family of ladybugs with varying sizes to represent each family member
- Making themed ladybugs, such as holiday or seasonal versions
- Attaching a small magnet to the back to create a fridge magnet
How do I seal and protect my ladybug painted rock?
To protect your ladybug painted rock, you can use a clear sealant or varnish. Sealing the rock helps prevent damage from outdoor elements and prolongs the life of the artwork4. Apply the sealant following the manufacturer’s instructions, and allow it to dry completely before handling or placing the rock outside.
What is the purpose behind hiding ladybug painted rocks?
Hiding painted rocks, including ladybug rocks, is a fun and popular activity that fosters creativity, community spirit, and acts of kindness. People often hide painted rocks in public spaces, like parks, trails, and playgrounds, for others to find, enjoy, and either keep or re-hide for someone else to find5. This activity often brings joy to both the creators and finders of painted rocks.