DIY room decor is a fun and creative way to personalize your living space. One of the most affordable and versatile materials for DIY projects is paper. From wall art to hanging mobiles, paper can be used to create a wide variety of decorative items that add character and charm to any room. In this article, we will explore some of the best DIY room decor with paper: creative ideas and step-by-step guide.
With a little creativity and some basic crafting supplies, you can make beautiful paper decor that reflects your personal style. Whether you prefer bold and colorful designs or delicate and intricate patterns, there are endless possibilities when it comes to paper crafts.
From paper flowers to geometric wall art, we will cover a range of projects that are easy to make and look stunning when displayed in your home. So, whether you’re a seasoned crafter or a beginner, read on to discover some inspiring DIY paper decor ideas that will transform your living space.
DIY Room Decor with Paper – Understanding the Basics
DIY room decor with paper is a fun and creative way to add a personal touch to your living space. It is also an affordable and eco-friendly way to decorate your home. In this section, we will discuss the basics of DIY room decor with paper.
Types of Paper
There are many types of paper that you can use for DIY room decor. Each type of paper has its own unique characteristics and uses. Here are some of the most common types of paper for DIY room decor:
- Construction paper: This is a thick and sturdy paper that comes in a variety of colors. It is great for making paper flowers, banners, and other decorations.
- Tissue paper: This is a thin and delicate paper that is often used for gift wrapping. It is also great for making paper pom-poms and other delicate decorations.
- Scrapbook paper: This is a decorative paper that is often used for scrapbooking. It comes in a variety of designs and patterns and is great for making paper garlands and other decorations.
Tools and Supplies
To get started with DIY room decor with paper, you will need some basic tools and supplies. Here are some of the most essential tools and supplies:
- Scissors: You will need a good pair of scissors to cut the paper into the desired shapes and sizes.
- Glue: You will need glue to hold the paper together and to attach it to other surfaces.
- Tape: You will need tape to hold the paper in place while you are working on it.
- Ruler: You will need a ruler to measure the paper and to make sure that your decorations are symmetrical.
- Pencil: You will need a pencil to sketch out your designs before you start cutting the paper.
Techniques
There are many techniques that you can use for DIY room decor with paper. Here are some of the most popular techniques:
- Origami: This is the art of folding paper into various shapes and designs. It is great for making paper animals, flowers, and other decorations.
- Paper cutting: This is the art of cutting paper into intricate designs. It is great for making paper snowflakes, lanterns, and other decorations.
- Quilling: This is the art of rolling and shaping paper strips into various shapes and designs. It is great for making paper flowers, butterflies, and other decorations.
With these basics in mind, you can start exploring the world of DIY room decor with paper and create unique and beautiful decorations for your home.
Materials Required for Paper Decor
Creating DIY room decor with paper is a fun and cost-effective way to add a personal touch to your space. Before you get started, you’ll need to gather a few basic materials. Here’s a list of the materials you’ll need to create your own paper decor:
1. Paper
The most important material for paper decor is, of course, paper! You can use a variety of different types of paper, including construction paper, scrapbook paper, tissue paper, and even old book pages. Choose a paper that fits the theme and style of your room.
2. Scissors
A good pair of scissors is essential for cutting and shaping your paper. Make sure your scissors are sharp and comfortable to use.
3. Glue
To hold your paper decor together, you’ll need some glue. You can use a glue stick, white school glue, or a glue gun depending on the project.
4. Cutting Tools
In addition to scissors, you may want to invest in some cutting tools such as a craft knife or paper trimmer. These tools can help you create precise cuts and shapes.
5. Embellishments
To add extra flair to your paper decor, consider adding embellishments such as stickers, ribbons, or sequins. These can help make your decor stand out and add a personal touch.
Overall, creating DIY room decor with paper is a fun and easy way to add a personal touch to your space. With a few basic materials, you can create beautiful and unique decor that reflects your style and personality.
Choosing the Right Paper
When it comes to DIY room decor with paper, choosing the right paper is crucial. The type of paper you select can impact the overall look and feel of your decor. Here are some things to consider when choosing the right paper:
Weight
The weight of the paper you choose will affect how sturdy it is and how well it holds up over time. For projects that require more durability, opt for heavier-weight paper. For example, if you’re making paper flowers that will be used as a centerpiece, you’ll want to use a heavier-weight paper than if you’re making a paper garland that will only be used for a short period of time.
Texture
The texture of the paper you choose can add dimension and interest to your DIY room decor. Consider using textured paper for projects like wall art or lampshades. Smooth paper may be more appropriate for projects like paper mobiles or origami.
Color
The color of the paper you choose is also important. Consider the color scheme of the room you’re decorating and choose paper that complements it. You can also use paper to add pops of color to a neutral room or to create a cohesive color scheme throughout the space.
Pattern
Patterned paper can add visual interest to your DIY room decor. However, it’s important to use patterned paper sparingly so as not to overwhelm the space. Consider using patterned paper for accents like throw pillows or small wall art pieces.
By considering these factors when choosing the right paper, you can ensure that your DIY room decor looks polished and professional.
Step-by-Step Guide to Creating Paper Decor
Creating paper decor for your room is an easy and affordable way to add a personal touch to your living space. With just a few simple materials, you can make beautiful and unique decorations that will brighten up any room. Here’s a step-by-step guide to help you get started:
- Choose your paper: The first step is to choose the type of paper you want to use. You can use any type of paper, including construction paper, scrapbook paper, tissue paper, or even old book pages. Consider the color, texture, and weight of the paper to create the desired effect.
- Choose your design: Once you have your paper, it’s time to choose your design. You can find inspiration online or create your own design. Consider the shape, size, and placement of your design to ensure it fits well in your room.
- Cut out your design: Use scissors or a craft knife to carefully cut out your design from the paper. If you’re creating a more intricate design, you may want to use a cutting machine like a Cricut or Silhouette.
- Assemble your design: Once you have all the pieces cut out, it’s time to assemble your design. You can use glue, tape, or string to hold the pieces together. Consider adding additional embellishments like glitter or ribbon to give your design some extra flair.
- Display your creation: Finally, it’s time to display your creation. You can hang it on the wall, place it on a shelf, or use it as a centerpiece. Consider the lighting and color scheme of your room to ensure your creation stands out.
With these simple steps, you can create beautiful and unique paper decorations for your room. Get creative and have fun with it!
Creating Paper Wall Art
If you’re looking for a way to add some personality to your walls, paper wall art is an excellent option. It’s affordable, customizable, and easy to make. In this section, we’ll explore three different types of paper wall art: paper flower wall art, origami wall art, and paper mosaic wall art.
Paper Flower Wall Art
Paper flower wall art is a beautiful way to add some color and texture to your walls. Here are the steps to create your own paper flower wall art:
- Choose your paper: You can use any type of paper you like, but thicker paper will hold its shape better. Consider using cardstock, construction paper, or even scrapbook paper.
- Cut out your flowers: There are many different ways to create paper flowers, but one of the easiest is to cut out flower shapes and layer them on top of each other. You can also add details like petals, stamens, and leaves.
- Arrange your flowers: Once you’ve created your flowers, you can arrange them on a canvas or piece of cardboard. Play around with different arrangements until you find one you like.
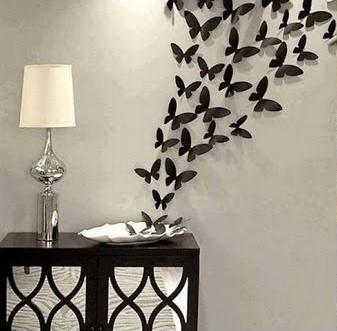
- Glue your flowers: Once you’ve arranged your flowers, glue them onto your canvas or cardboard. You can also add other elements like butterflies, birds, or vines.
Origami Wall Art
Origami wall art is another beautiful way to add some interest to your walls. Here are the steps to create your own origami wall art:
- Choose your paper: Origami paper is the best option for this type of wall art, but you can also use regular paper if you don’t have any on hand.
- Choose your design: There are many different origami designs to choose from, but some of the easiest include cranes, butterflies, and flowers.
- Fold your paper: Follow the instructions for your chosen origami design to fold your paper into the desired shape.
- Arrange your origami: Once you’ve created your origami shapes, you can arrange them on a canvas or piece of cardboard. Play around with different arrangements until you find one you like.
- Glue your origami: Once you’ve arranged your origami, glue it onto your canvas or cardboard.
Paper Mosaic Wall Art
Paper mosaic wall art is a fun way to add some texture and color to your walls. Here are the steps to create your own paper mosaic wall art:
- Choose your paper: You can use any type of paper you like, but the thicker paper will hold its shape better. Consider using cardstock, construction paper, or even scrapbook paper.
- Cut out your shapes: Cut out small shapes from your paper. You can use a variety of shapes, such as squares, circles, or triangles.
- Arrange your shapes: Once you’ve cut out your shapes, you can arrange them on a canvas or piece of cardboard. Play around with different arrangements until you find one you like.
- Glue your shapes: Once you’ve arranged your shapes, glue them onto your canvas or cardboard. You can also add other elements like glitter or sequins for some extra sparkle.
Creating Paper Lanterns
Paper lanterns are a simple and inexpensive way to add a touch of elegance to your home decor. With just a few supplies and some creativity, you can create beautiful paper lanterns that will brighten up any room.
To make your own paper lanterns, you will need:
- Colored or patterned paper
- Scissors
- Glue or double-sided tape
- Ruler
- Pencil
- LED light or tea light candle
To start, measure and cut your paper into a rectangular shape. The size of your paper will depend on the size of the lantern you want to create. A good size to start with is 8.5 x 11 inches.
Next, fold your paper in half lengthwise, crease it, and unfold it. Fold the paper in half widthwise and crease it again. Then, fold the paper in half diagonally, crease it, and unfold it. You should now have creases that form a cross in the center of your paper.
Using your scissors, cut along the creases from the edges of the paper toward the center. Stop cutting about 1 inch from the center. Repeat this on all four sides of the paper.
Once you have cut all the way around, fold the paper back up and secure the edges with glue or double-sided tape. You should now have a cylinder-shaped lantern with four flaps at the top.
Fold the flaps down and secure them with glue or tape. Then, cut a strip of paper to use as a handle and attach it to the top of the lantern.
Finally, insert an LED light or tea light candle into the lantern and enjoy your beautiful creation.
With a little practice, you can experiment with different paper sizes, shapes, and colors to create a variety of unique and stunning paper lanterns to decorate your home.
Creating Paper Photo Frames
One of the easiest and most budget-friendly ways to decorate your room is by creating paper photo frames. Not only are they easy to make, but they also add a personal touch to your room decor. Here are a few simple steps to create a paper photo frame:
- Gather materials: You will need paper, cardboard, scissors, and a photo to create a paper photo frame. You can use any type of paper, but cardstock is recommended for a sturdier frame.
- Cut the cardboard: Cut a piece of cardboard slightly larger than your photo to use as the base of your frame.
- Cut the paper: Cut the paper into an open envelope shape. The paper should be slightly larger than your photo to create a border around the picture.
- Fold the paper: Fold the paper to create the frame’s border. Make sure to crease the folds well to keep the frame in place.
- Insert the photo: Insert your photo into the frame. You can use tape or glue to secure the photo to the cardboard.
- Display your frame: Your paper photo frame is now ready to be displayed. You can hang it on the wall or place it on a shelf or desk.
Creating paper photo frames is a fun and easy way to add a personal touch to your room decor. You can experiment with different types of paper and colors to create unique frames that match your style. Plus, they make great gifts for friends and family.
Creating Paper Baskets
One of the easiest and most versatile DIY room decor projects you can undertake is creating paper baskets. With just a few simple materials, you can make a beautiful and functional basket that can be used to store anything from stationery to snacks.
To get started, you’ll need some basic materials such as paper, scissors, glue, and a ruler. You can use any type of paper you like, from plain white printer paper to colorful scrapbook paper. You can also experiment with different textures and patterns to create a unique look.
One popular method for creating paper baskets is using origami techniques. This involves folding the paper in a specific way to create a basket shape. There are many origami basket tutorials available online, and they range in difficulty from beginner to advanced.
Another option is to create a woven paper basket. This involves cutting strips of paper and weaving them together to create a basket shape. You can use different colors of paper to create a striped or multicolored effect.
Once you’ve created your paper basket, you can decorate it with additional embellishments such as ribbon, stickers, or glitter. You can also use it to store items such as pens, pencils, or even snacks like popcorn or candy.
Overall, creating paper baskets is a fun and easy DIY room decor project that can add a touch of personality to any space. With a little creativity and some basic materials, you can create a beautiful and functional basket that is uniquely your own.
Safety Tips While Working with Paper
When working with paper for DIY room decor, it is important to keep safety in mind. Here are some safety tips to follow:
1. Use Sharp Objects Carefully
When using cutting or gouging tools, always direct them away from your body. Keep your fingers away from the blade and use a cutting mat to protect surfaces. Always use a sharp blade, as dull blades can slip and cause injuries.
2. Create a Safe Workspace
Make sure you have enough room to work safely and efficiently. Papercrafts should be done in an area with plenty of light and adequate airflow. Keep your workspace clean and organized to prevent accidents.
3. Use Non-Toxic Materials
When choosing paper and other materials for your DIY room decor, make sure they are non-toxic. Avoid using materials with harmful chemicals that can cause skin irritation or respiratory problems.
4. Protect Your Eyes
Wear safety goggles or glasses to protect your eyes from flying debris or paper dust. This is especially important when using power tools or cutting machines.
5. Keep Children and Pets Away
If you have children or pets, keep them away from your workspace when working with sharp tools or materials. Store your tools and materials in a secure location when not in use.
By following these safety tips, you can enjoy creating beautiful DIY room decor with paper while keeping yourself and others safe.
Maintaining Your Paper Decor
One of the benefits of using paper for your DIY room decor is that it is relatively easy to maintain. Here are some tips to keep your paper decor looking its best:
Avoid Direct Sunlight
Paper is susceptible to fading when exposed to direct sunlight for prolonged periods. To prevent your paper decor from losing its color and vibrancy, avoid placing it in areas that receive direct sunlight. If you must place it in a sunny area, consider using a UV-resistant spray to protect it.
Keep It Dry
Paper can absorb moisture, which can cause it to become discolored or even moldy. To keep your paper decor dry, avoid placing it in humid areas such as bathrooms or kitchens. If you live in a humid climate, consider using a dehumidifier to keep the air dry.
Dust Regularly
Dust can accumulate on paper decor, which can make it look dull and dirty. To keep your paper decor looking its best, dust it regularly with a soft, dry cloth or a feather duster. Avoid using water or cleaning products, as they can damage the paper.
Store Properly
If you need to store your paper decor, make sure to do so properly. Store it in a cool, dry place away from direct sunlight and moisture. Consider using acid-free tissue paper to wrap it, as this will help prevent it from becoming brittle over time.
By following these simple tips, you can keep your paper decor looking beautiful for years to come.
DIY Room Decor with Paper – Wrapping Up
In conclusion, DIY room decor with paper is a great way to add a personal touch to your living space without breaking the bank. With a little bit of creativity and some basic supplies, you can create unique and beautiful decorations that reflect your style and personality.
Throughout this article, we have explored a variety of DIY paper decor ideas, including paper flowers, mobiles, garlands, and wall hangings. We have also provided links to helpful tutorials and resources to guide you through the process.
One of the great things about DIY paper decor is that it is accessible to everyone, regardless of skill level or budget. With just a few sheets of paper and some basic tools, you can create something beautiful and meaningful that will make your home feel more inviting and cozy.
Whether you are looking to spruce up your bedroom, living room, or office, DIY paper decor is a versatile and affordable option that can be customized to fit your specific needs and preferences. So why not give it a try and see what you can create?
DIY Room Decor with Paper FAQs
How to make paper decorations for your room step by step?
Making paper decorations for your room can be a fun and easy DIY project. You can start by selecting the type of paper you want to use. You can use colored paper, patterned paper, or even recycled paper. Once you have your paper, you can start making your decorations. You can fold, cut, and glue the paper to create various shapes and designs.
What are some creative paper crafts for bedroom wall decoration?
There are many creative paper crafts that you can use for bedroom wall decoration. You can make paper flowers, paper lanterns, paper garlands, and paper butterflies. You can also make paper cutouts and create a collage on your wall. The possibilities are endless.
What are some easy DIY room decor ideas with paper?
There are many easy DIY room decor ideas with paper. You can make paper photo frames, paper lampshades, and paper mobiles. You can also make paper wall art by framing your favorite quotes or creating a geometric design with paper cutouts.
What are some unique paper decorations that can be made for a room?
There are many unique paper decorations that can be made for a room. You can make a paper chandelier, a paper tree, or even a paper clock. You can also make paper sculptures or create a paper wall hanging.
How can I decorate my room without spending money?
You can decorate your room without spending money by using items you already have. You can repurpose old magazines or newspapers to create paper decorations. You can also use natural materials like leaves or flowers to create a nature-inspired decor. You can also rearrange your furniture or create a new layout to give your room a fresh look.
What are some simple DIY ideas for decorating a bedroom with paper crafts?
Some simple DIY ideas for decorating a bedroom with paper crafts include making a paper flower bouquet, creating a paper garland, or making a paper mobile. You can also make paper lanterns or create a paper collage on your wall. The possibilities are endless, and you can let your creativity run wild.